Customer Portal QuickStart Guide An overview of how to get started with your personal Diversigen customer portal

Welcome to your personal Diversigen customer portal! In this documentation we will walk through how to get started with your portal, from logging in, right down to accessing your results.  

In this guide we will cover

  1. Logging into your account for the first time 
  2. Updating your password 
  3. Updating your team name
  4. Viewing multiple teams
  5. Accessing your data and Core Analysis™ reports 
  6. Adding team members
  7. Adding a collaborator
  8. Getting help

Step 1 Logging in to your account for the first time

As a customer of Diversigen, a personal portal has already been created for your project. When your portal is assigned to you, you will receive a welcome email with a temporary password enclosed to access the portal for the first time and complete account setup.


Your account security is extremely important to us.  All logins to the portal have been configured with multi-factor authentication and your welcome email will include a link to download a recommended authenticator app to your mobile device. Please ensure you have an authenticator downloaded on your device and ready before logging in. 


Below are links to our recommended authenticator apps: 

Google Play Store: https://play.google.com/store/apps/details?id=com.google.android.apps.authenticator2&hl=en

Apple App Store: https://apps.apple.com/us/app/google-authenticator/id388497605  


To access the portal, you can click the link at the bottom of the welcome email to be directed to the sign in page.  You can also visit the Diversigen website (https://www.diversigen.com/) and click “sign in” at the top right a menu bar to get access to the portal login.


To sign into your account simply follow the prompts to fill in your email and temporary password (provided in your welcome email), click sign in. You will then be asked to change your password from your temporary, to a new password.   


Once your password has been changed you will be prompted to set up your multi-factor authentication. A QR code will be presented to you on the screen.  This QR is needed to connect your portal account to the authenticator app and will only be shown on portal set up. Through your preferred authenticator app, scan the QR code to receive a 6-digit code to input into the log in screen.  You will also have the option to name your multi-factor device for easier identification.


In the future, if you have forgotten your password, you can click “forgot password” in the sign in box.

Step 2 Updating your password

It’s always good practice to update your passwords regularly.  Once logged in, navigate to “settings” in the sidebar menu.   

In the settings panel you can update your account and organization information as well as curate your personal portal experience. To update your password, navigate to the “user settings” tab within the settings panel. Scrolling down you will see a section “change password”, it is here that you will input that temporary password and update it to a new one. 


Once complete you should see a green notification that you have successfully changed your password.  As a gentle reminder, please do not share or misplace your password, the security of your data could be at risk if a password is mishandled. 


Step 3 Updating your team name

Team names help user who are members of multiples teams within an organization effectively navigate their team’s Core Analysis™ reports. To personalize a team, an admin user can add or update a team name by selecting “settings” in the sidebar menu, then clicking “team” within the top menu bar. Here the admin will see the organization name at the top and team name below. 

Simply type in the desired team name in the bottom text box and select save to update your organizations team name. The updated team name will display immediately and the team name can be changed at any time in the future.

Admins of multiple teams can update the individual team names by switching the team displayed through the bottom left avatar icon. (See Step 4 for more details.) Once displaying the new team, the admin can then repeat the steps above to update the corresponding team name.

Step 4 Viewing multiple teams

In some cases, you may be a part of multiple teams within your organization each with their own Core Analysis™ reports and data. To switch between teams that you are a member of, click your avatar icon in the bottom left to open the team menu. Select the team you wish to display to update the dashboard with the respective Core Analysis™ reports of that team. 

Step 5 Accessing your data and Core Analysis reports

One of the main features of your personal portal is the ability to access your organization’s sample data and results in a simple and secure manner.   

To access your sample data and results, navigate to the “dashboard” in the sidebar menu to view a list of your organization’s project reports.  


Click on your desired project to be directed to Core Analysis report that will include your projects’ sequence data, QC dashboard, annotated feature tables, and visual outputs of microbiome composition, and alpha and beta diversity. 


Step 6 Adding team members

In the customer portal, each environment is given 3 access seats, plus a single Admin. Admin users can add other team members to their portal and set user roles. Team members will have viewer access and be able to see all reports and data associated with the team’s portal.  Team Members do not have the ability to make changes, add other members or add collaborators.  

Within the customer portal, an Admin user has the sole ability to add users to the portal.  To add an additional user, an admin will need to navigate to the settings of portal and click the team management tab.


On the team management tab click on the “+ Add New User” button.  A pop-up will appear asking for key details about the user you are wishing to add.  

Once added the new user will get an email notification that they have been granted access to the team’s customer portal.  They will login using the same steps outlined in the customer portal QuickStart guide.


User Roles:

  • Admin – A user with all functionalities of the customer portal who is responsible for the management of team members and collaborator users.  This role has complete oversight of the team’s customer portal experience. There can only be one admin delegated to a team.
  • Team Member – A user with view-only access to the entirety of the team’s customer portal data. This role has visibility to all reports, as well as settings, but cannot make changes to the portal experience.
  • Collaborator – A user with access restricted access to only the reports that have been assigned to them by the admin. This user role allows for a team the ability to share selected reports with others without allowing visibility to the entirety of the team’s reports on the customer portal.


Be sure to keep an eye on how many seats of access your team portal has available. The Diversigen customer portal allows a maximum of four users with three team members and a single admin.  


The team admins is responsible for the management and allocation of access for all users within the customer portal.  In the settings of the Diversigen customer portal the admin can see who has access to the team’s portal, when they were added, and their access role.  


An admin can always add, edit or remove another user from their team’s portal by clicking the ellipsis icon for that user.  Removing a user immediately frees up a seat of access to the team’s portal.


Step 7 Adding a collaborator

In special cases, you may need to give access to someone outside of your team to view a report within the customer portal. A collaborator is a special role within customer portal that limits access to only what has been allocated by the admin of the portal. Admin users can give access to select reports to a collaborator for a specified period. This allows a non-team member to access a report from your portal without allowing access to the entirety of the customer portal.   

An admin can add a collaborator to a report by choosing a report from the dashboard and clicking the ellipsis icon in the top right corner.


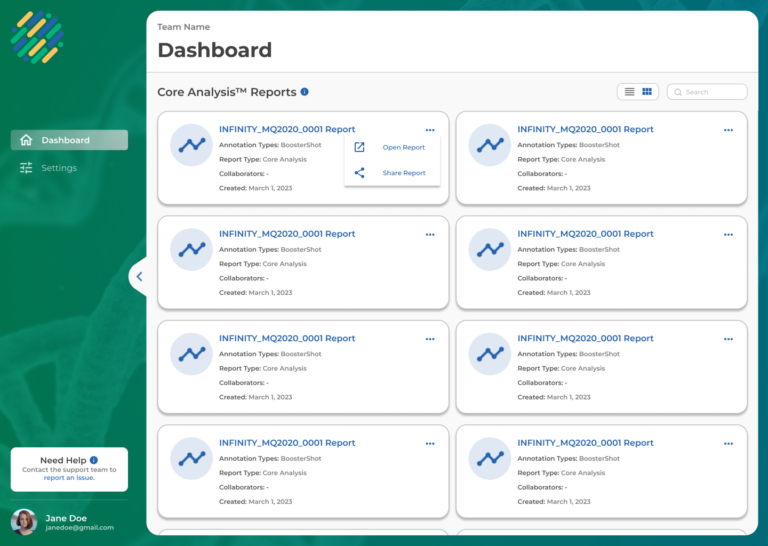
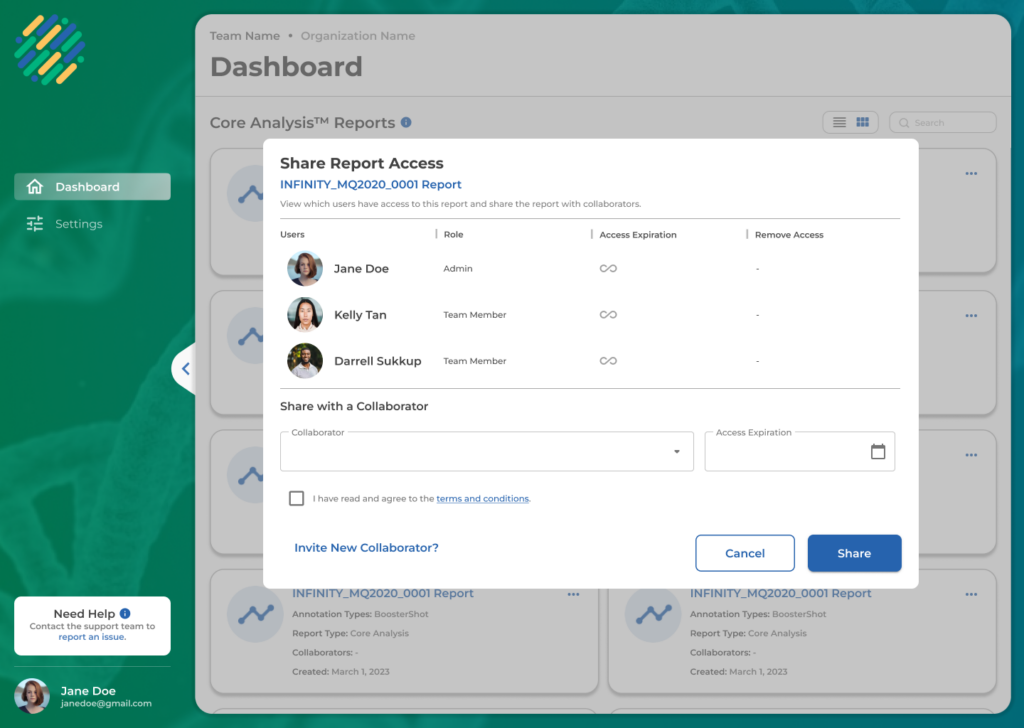
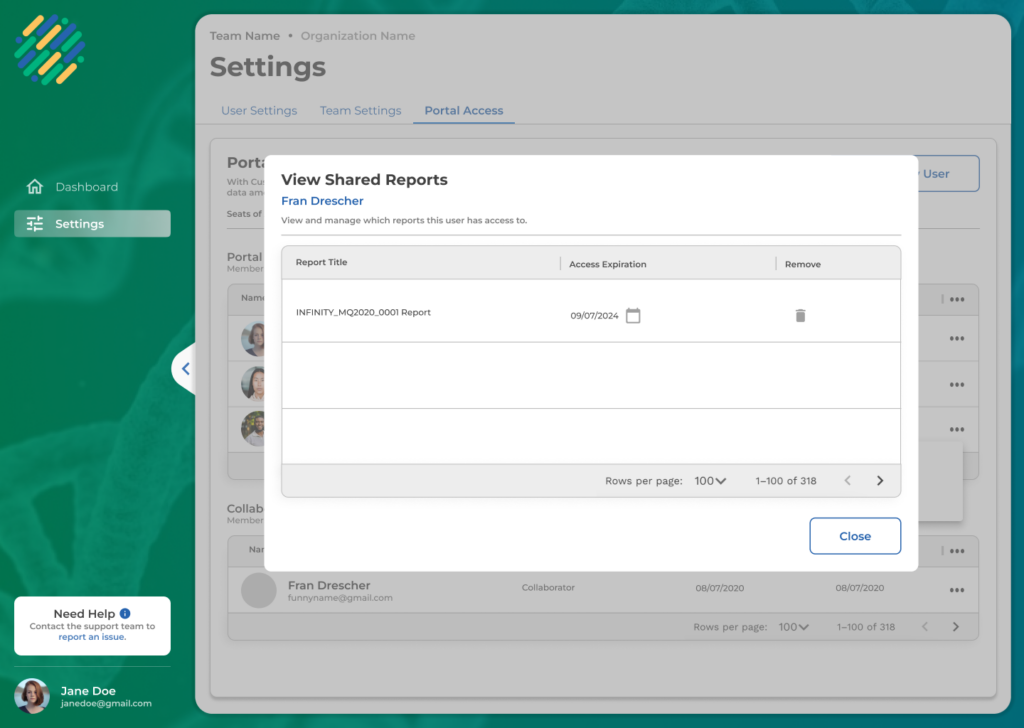
Clicking, “Share Report”, will open a pop-up outlining who currently has access to this report, their portal role, how long they have access for, and an option to remove any user from the report if applicable.

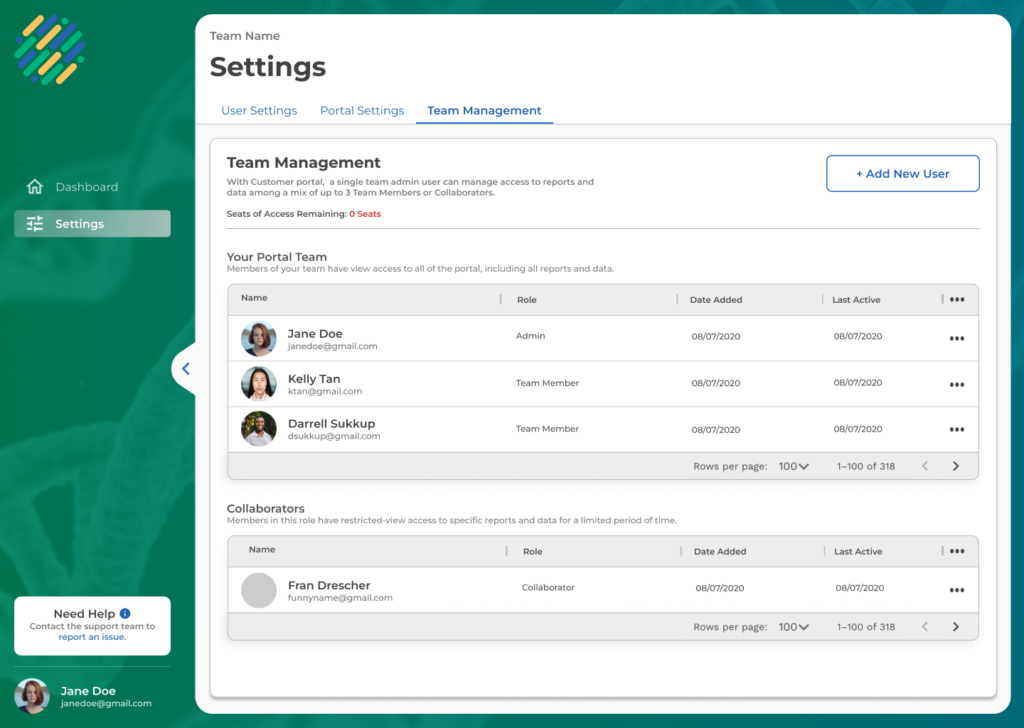
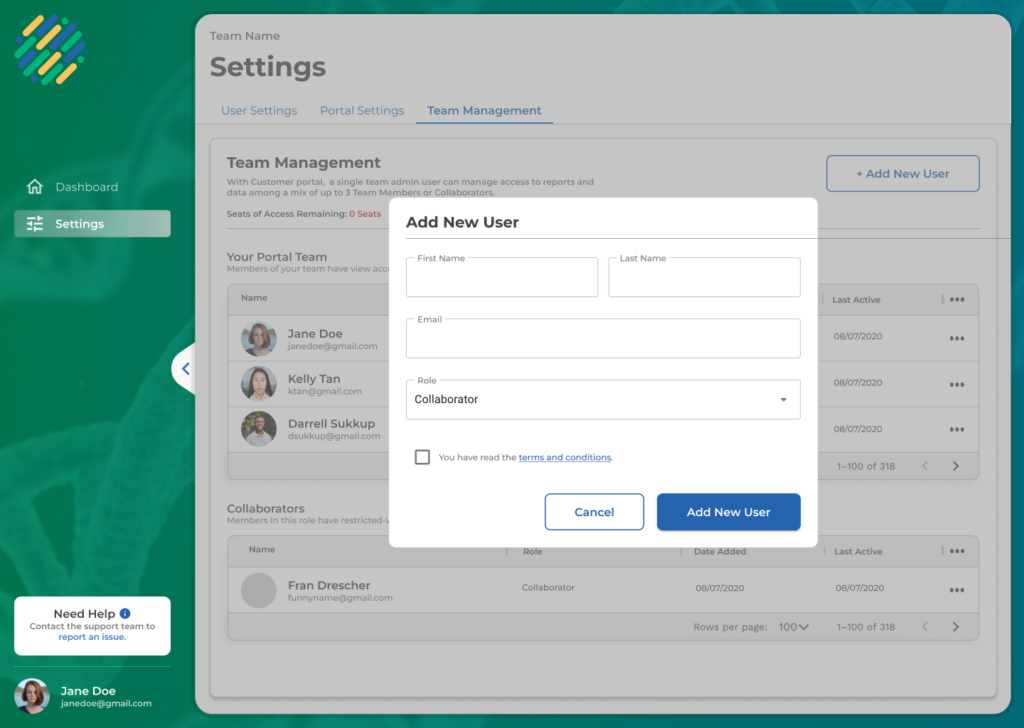
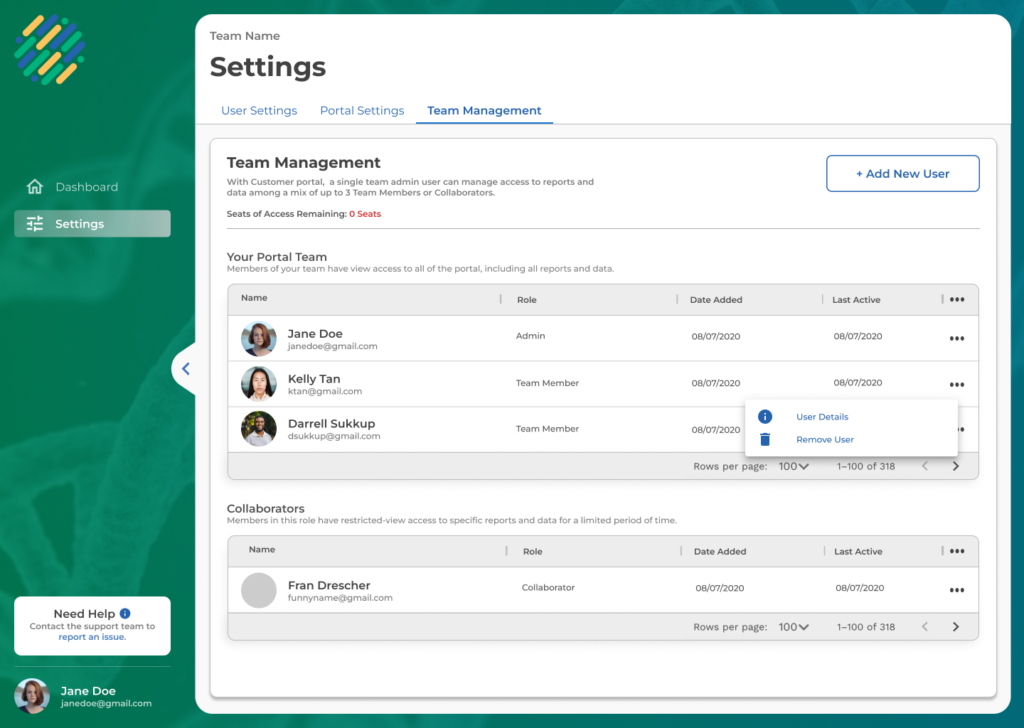
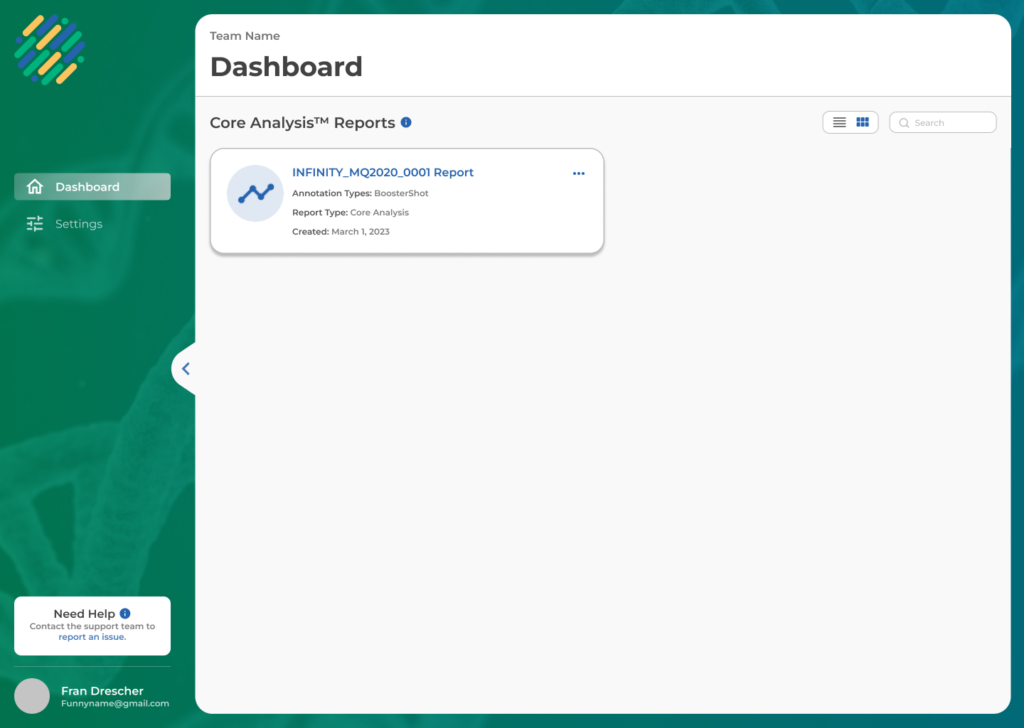
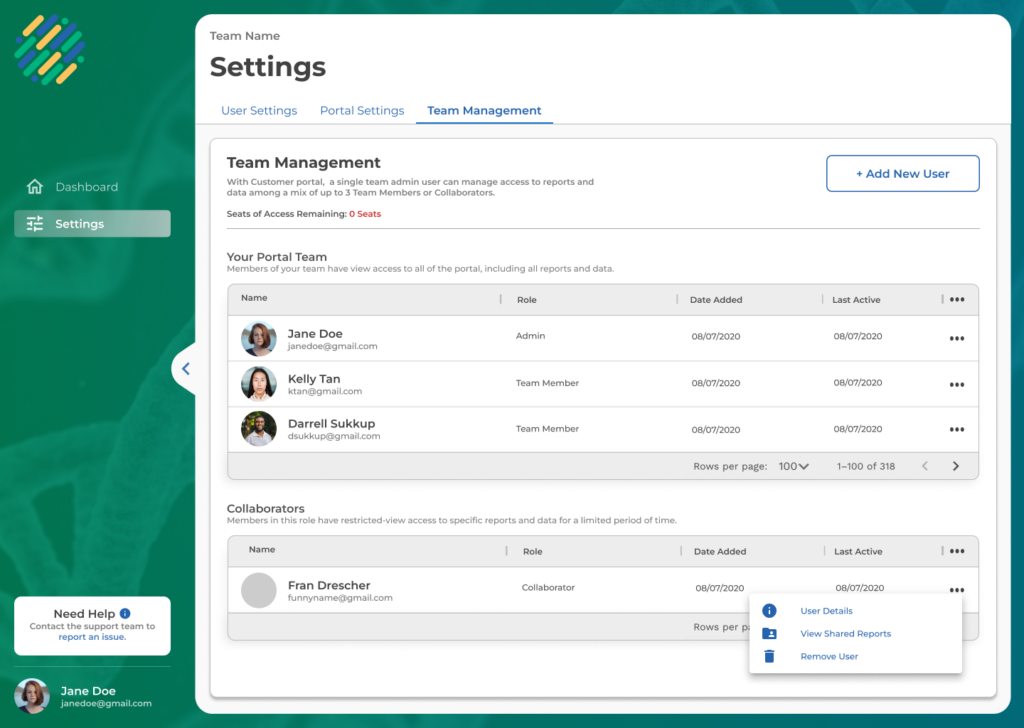
To share a report with a collaborator, that user must have access to the team’s portal first. An admin can do this by adding the collaborator from within the team management tab. Doing this will populate the collaborator as a user in the collaborator dropdown of the share report pop-up. The admin can also select, “Invite new Collaborator?” when sharing a report and fill in the form fields to invite a new collaborator. By doing so this will allow access to the collaborator and add them as a user in the collaborator dropdown of the share report pop-up. Once you have selected your collaborators that you would like to share this report to click, “Share” and the report will be accessible to the collaborator.


Reading and checking the Diversigen customer portal terms and Conditions is mandatory before a report can be shared.


Collaborators will get an email notification that they have been granted access to the customer portal. They will login using the same steps outlined in the customer portal QuickStart Guide. Collaborators will have their access limited to view only the shared reports and changing their user specific settings.


Admins can remove collaborators from reports, extend their access expiration dates, upgrade collaborator access, or remove a collaborator from their customer portal.

In the settings window in the team management tab an admin will be able to see everyone who has access to their team’s customer portal.


By clicking the ellipsis icon for a particular user, the admin can select tools to help manage and oversee access to the portal.


An Admin can make changes to a collaborators access by clicking the “View Shared Reports.” From here an admin can remove an individual report or change the date of expiration of report access.


The team admin will need to manage the number of users accessing the portal at any given time. Just like any other user, a collaborator will take up a seat of access in the team’s portal. To free up a seat for another user, an admin can remove collaborators from their team’s portal. All portals are limited to a total of 4 seats, with 3 team members or collaborators and a single admin user.


Step 8 Getting help

If you require support for your project, you can always reach out to info@diversigen.com or contact your service coordinator directly. 

For portal specific requests, issues, or technical support our support team can be contacted by clicking “report an issue” in the white “Need Help?” Box in the lower left side of the window while you are logged into the portal. 


Innovate the way you interpret the microbiome